Mybatis-plus官网:https://baomidou.com/
一 mybatis document
mybatis – MyBatis 3 官方文档:https://mybatis.org/mybatis-3/index.html
MyBatis is a first class persistence framework with support for custom SQL, stored procedures and advanced mappings.
Mybatis是一个优秀的持久层框架,又叫做 ORM框架 (半自动化、轻量级的ORM框架)。
ORM:Object Relationship Mapping(对象关系映射)。
Mybatis其实就是一个可以帮助我们把对象映射为关系型数据库中的记录,把关系型数据库中的记录映射为对象的这么一个持久层框架。

持久层:持久层是指和数据库打交道的这一层。

Mybatis其实就是一个可以帮助我们自定义SQL语句去操作数据库,对数据库进行增删改查的这么一个框架。
简化我们对于数据库的操作,简化JDBC的流程。
/* 为什么使用Mybatis?

- 对比JDBC
  - 原生的JDBC使用流程更复杂,操作繁琐
  - SQL语句和代码严重耦合,存在硬编码
  - 结果集解析不智能,需要手动解析

- 对比DBUtils
  - SQL语句和代码严重耦合,存在硬编码
  - 结果集解析的时候其实还是需要我们传入不同的ResultSetHandler,不够强大
  - 对于连接查询的情况,是不太能够支持的
1. Getting started
To use MyBatis you just need to include the mybatis-x.x.x.jar file in the classpath.
If you are using Maven just add the following dependency to your pom.xml:
<dependency>
  <groupId>org.mybatis</groupId>
  <artifactId>mybatis</artifactId>
  <version>x.x.x</version>
</dependency>
**The configuration XML file ** ( mybatis-config.xml ):
<?xml version="1.0" encoding="UTF-8" ?>
        <!DOCTYPE configuration
                PUBLIC "-//mybatis.org//DTD Config 3.0//EN"
                "http://mybatis.org/dtd/mybatis-3-config.dtd">
<configuration>
    <!--获取properties配置文件-->
    <properties resource="jdbc.properties"/>
    <environments default="development">
        <environment id="development">
            <transactionManager type="JDBC"/>
            <dataSource type="POOLED">
                <property name="driver" value="${driverClassName}"/>
                <property name="url" value="${url}"/>
                <property name="username" value="${username}"/>
                <property name="password" value="${password}"/>
            </dataSource>
        </environment>
    </environments>
<mappers>
    <!--<mapper resource="org/mybatis/example/BlogMapper.xml"/>-->
    <mapper resource="cn/drizzle/mapper/userMapper.xml"/>
</mappers>
</configuration># jdbc.properties
driverClassName=com.mysql.jdbc.Driver
url=jdbc:mysql://localhost:3306/academy?useSSL=false&characterEncoding=utf8
username=root
password=123456Building SqlSessionFactory from XML:
// 通过反射或者mybatis提供的 Resources.getResourceAsStream() 读取 maven项目的resources目录下的配置文件

// InputStream inputStream = SelectTest.class.getClassLoader().getResourceAsStream("mybatis-config.xml");
InputStream inputStream = Resources.getResourceAsStream("mybatis-config.xml");

SqlSessionFactory sqlSessionFactory = new SqlSessionFactoryBuilder().build(inputStream);
Acquiring a SqlSession from SqlSessionFactory:
配置mapper.xml:
<?xml version="1.0" encoding="utf-8" ?>
<!DOCTYPE mapper
    PUBLIC "-//mybatis.org//DTD Mapper 3.0//EN"
    "http://mybatis.org/dtd/mybatis-3-mapper.dtd" >
<mapper namespace="cn.itdrizzle.userMapper">
    <select id="selectUserById" resultType="cn.itdrizzle.bean.User">
      select * from user where id = #{id}
    </select>
</mapper>
The SqlSession contains absolutely every method needed to execute SQL commands against the database. You can execute mapped SQL statements directly against the SqlSession instance. For example:
SqlSession sqlSession = sqlSessionFactory.openSession();

// 通过SQLSession执行SQL语句
// 传入两个参数 1. SQL语句的坐标(namespace+id) 2. SQL语句的参数
User user = sqlSession.selectOne("cn.itdrizzle.userMapper.selectUserById", 1);
System.out.println(user);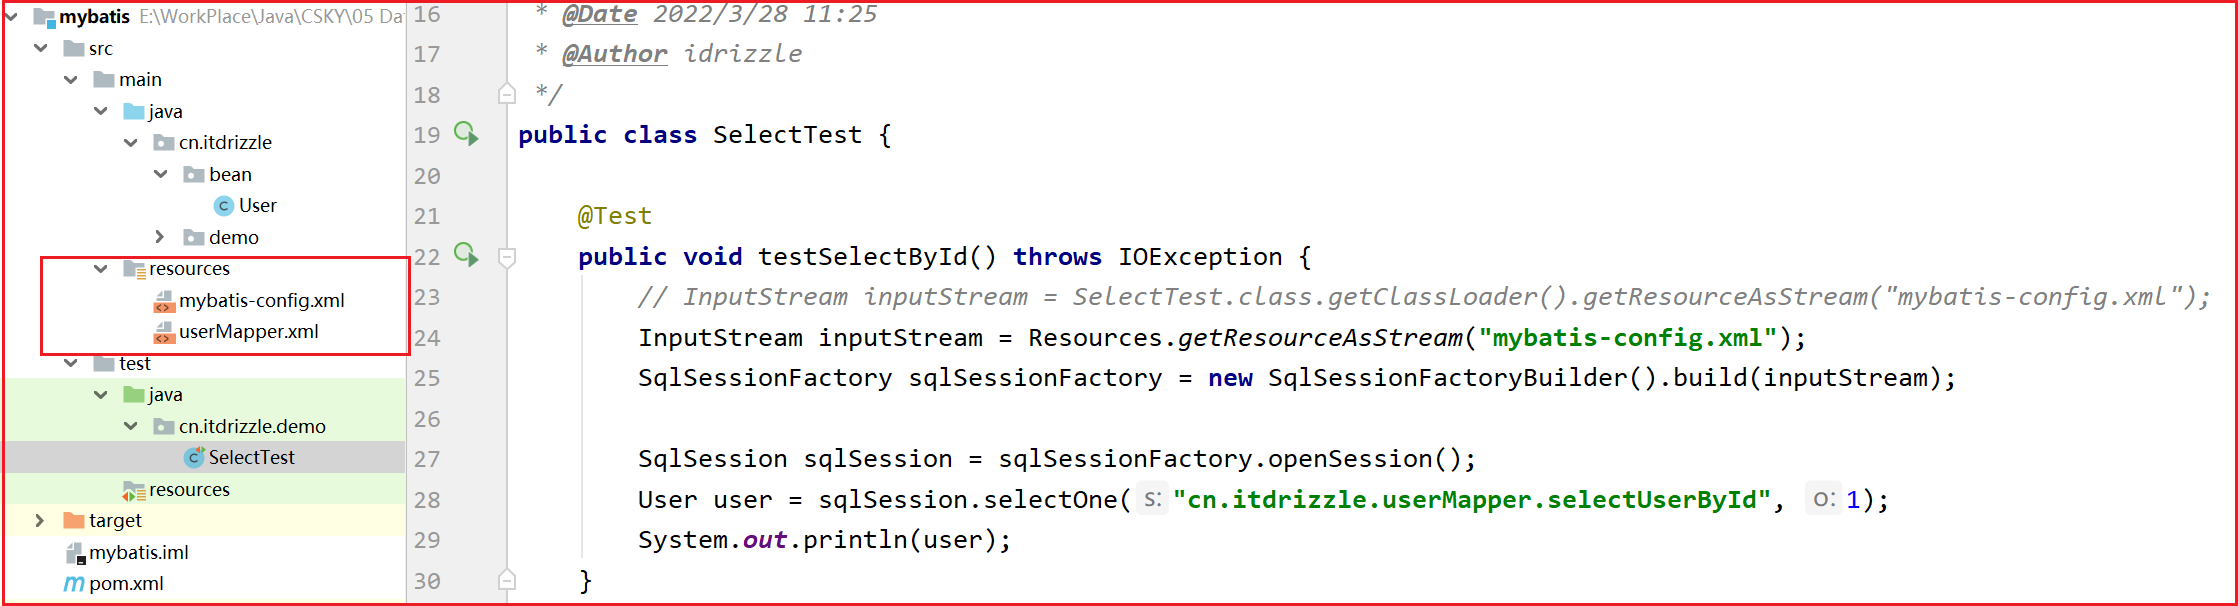
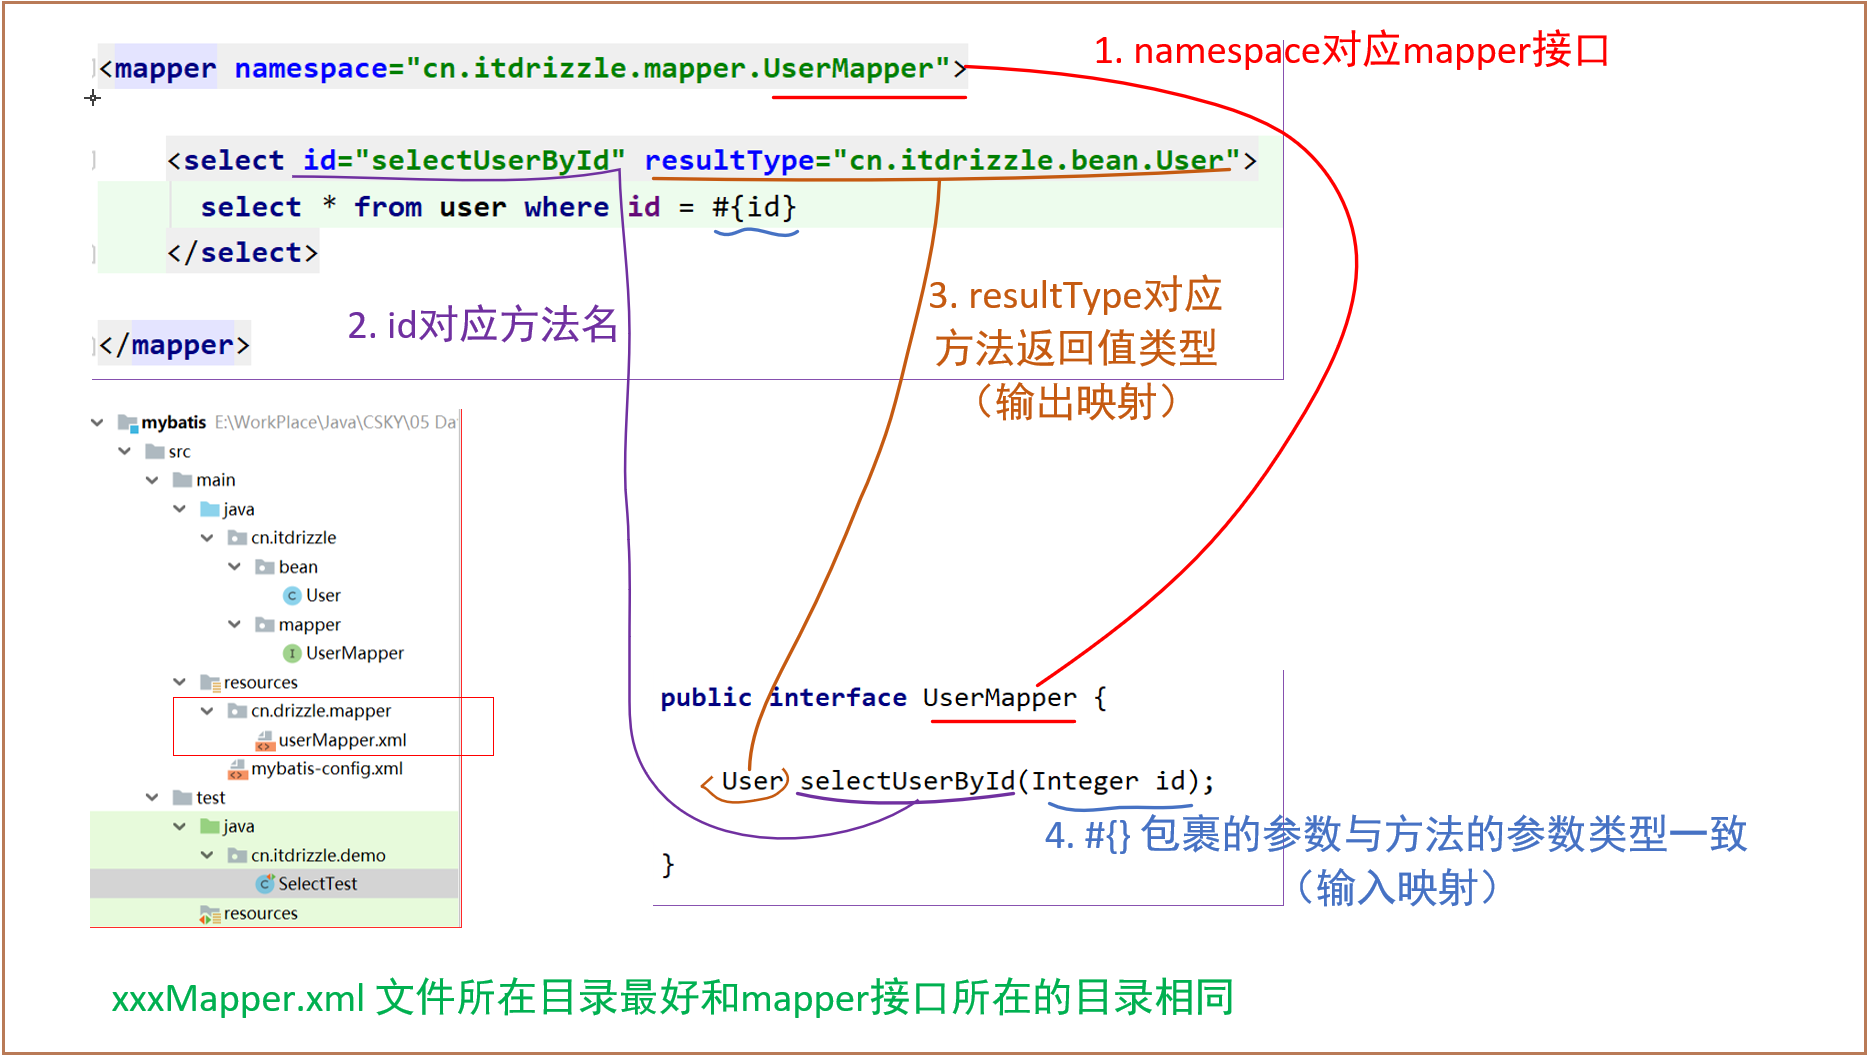
2. Mybatis动态代理
关于使用Mybatis的动态代理,有几个规范是需要遵守的
- 接口的全限定名称和配置文件中的namespace保持一致
- 接口中的方法名和配置文件中的的id值保持一致
- 接口的返回值类型和resultType中的值保持一致 (输出映射)
- 接口的参数和标签中的参数保持一致 (输入映射)
还有几个行业默认的规范(不遵守不会报错,但是建议遵守)
-
mapper.xml配置文件的名字,最好和接口保持一致
-
mapper.xml配置文件和接口文件,在编译之后最好在同一级目录下
创建mapper接口(注意接口与xml配置文件的对应关系,如下图所示:)
/**
* 使用mybatis的动态代理
* @author itdrizzle
* @date 2022/3/28 14:38
*/
@Test
public void testSelectByProxy() throws IOException {
    InputStream inputStream = Resources.getResourceAsStream("mybatis-config.xml");
    SqlSessionFactory sqlSessionFactory = new SqlSessionFactoryBuilder().build(inputStream);

    SqlSession sqlSession = sqlSessionFactory.openSession(true);

    UserMapper userMapper = sqlSession.getMapper(UserMapper.class);

    User user = userMapper.selectUserById(1);
    System.out.println(user);
}
使用动态代理的流程

- 1. 声明一个接口
- 2. 写一个与接口对应的mapper.xml配置文件
- 3. 获取接口的代理对象
    // 获取代理对象(MapperProxy的实例对象)
    AccountMapper accountMapper = sqlSession.getMapper(AccountMapper.class);

- 4. 执行接口中的方法
    每一个接口都是和mapper.xml配置文件对应起来的;
    每一个接口中的方法都是和mapper.xml配置文件中的SQL语句的标签对应起来的,
    那么我们去执行接口中的方法的时候,其实就是相当于执行SQL语句,获取SQL语句的结果。
3.mybatis常用配置
1) properties
-
配置一个jdbc.properties
propertiesdriverClassName=com.mysql.jdbc.Driver url=jdbc:mysql://localhost:3306/dbName?useSSL=false&characterEncoding=utf8 username=root password=123456 -
在mybatis-config.xml中引入properties配置文件
xml<!-- 加载properties 配置文件--> <properties resource="jdbc.properties"/>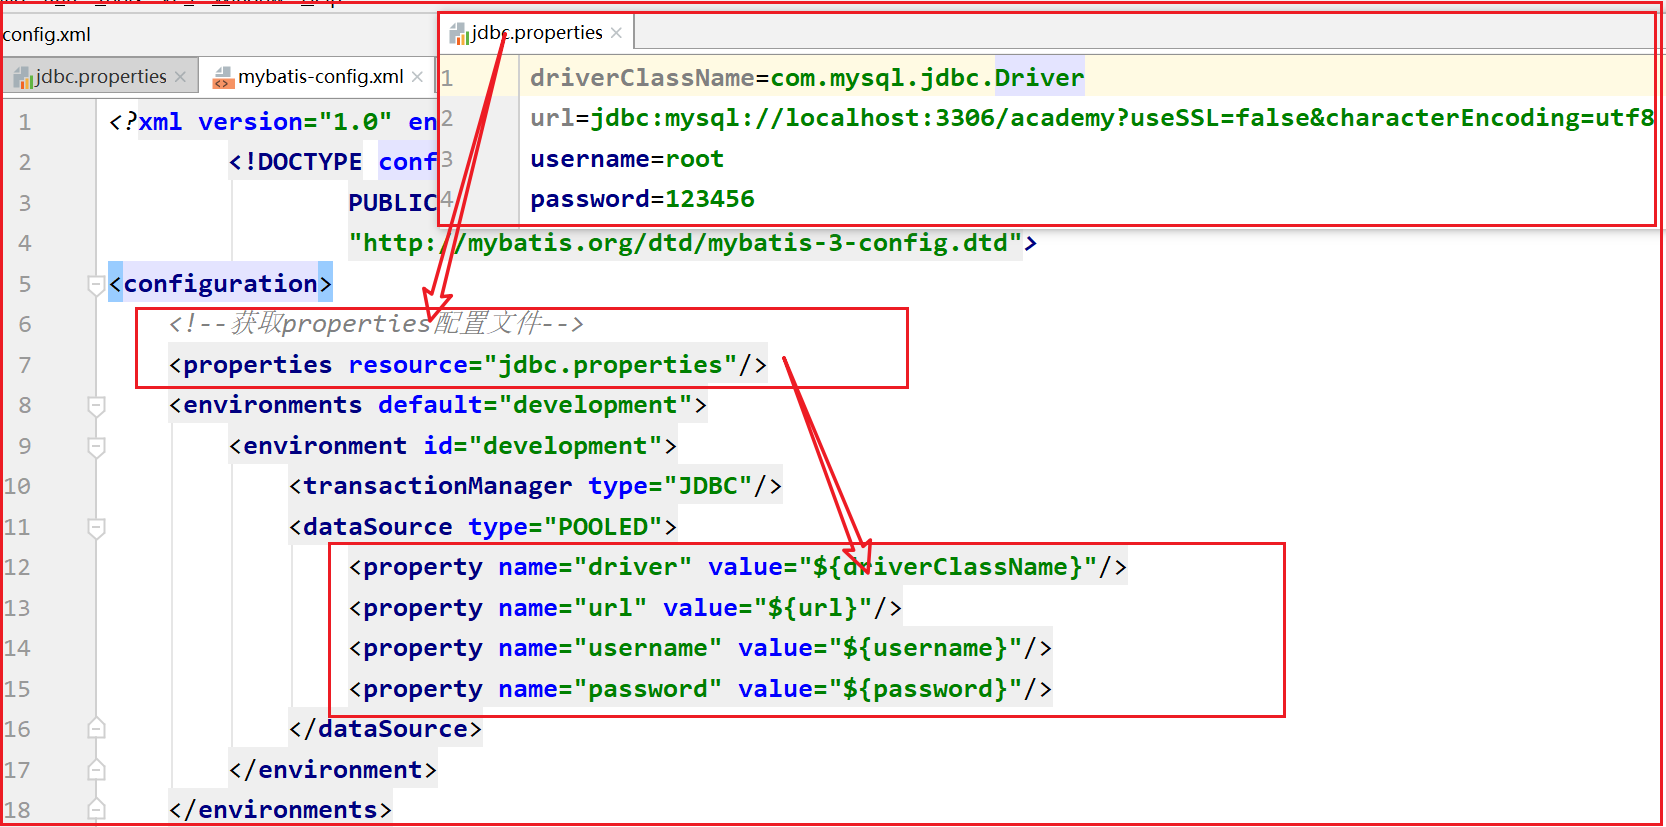
2) settings
这个里面是Mybatis极为重要的配置,会改变Mybatis的行为与属性值。
可以有很多配置,例如懒加载,缓存,日志等
<settings>
    <!-- 日志配置 -->
    <setting name="logImpl" value="STDOUT_LOGGING"/>

    <!-- 懒加载   true: 表示开启  false:表示关闭 -->
    <setting name="lazyLoadingEnabled" value="true"/>


    <!--<setting name="" value=""/>-->
    <!--<setting name="" value=""/>-->
    <!--<setting name="" value=""/>-->
</settings>
/* 懒加载:延迟加载的意思
   是指在我们使用多表查询的分次查询的时候,假如第二次执行的SQL语句结果,代码中没有引用的话,就不加载,
   等到需要第二次查询的SQL语句的结果被引用的时候,再去执行SQL语句
3) TypeAliases
类型别名的配置。 即可以对Mybatis配置文件中的类型去取别名。
-
配置别名
xml<!-- 别名的配置 --> <typeAliases> <!-- 给单个java实体类取别名 --> <typeAlias type="cn.itdrizzle.bean.User" alias="user"/> <!-- 批量起别名(该包下的所有类的类名即为别名,且不区分大小写) --> <package name="cn.itdrizzle.bean"/> </typeAliases> -
使用别名
xml<select id="selectUserById" resultType="user"> select * from t_user where id = #{id} </select>
内置别名:Mybatis给我们提供了很多内置的别名
| 别名 | 映射的类型(java中的类型) |
|---|---|
| _byte | byte |
| _long | long |
| _short | short |
| _int | int |
| _integer | int |
| _double | double |
| _float | float |
| _boolean | boolean |
| string | String |
| byte | Byte |
| long | Long |
| short | Short |
| int | Integer |
| integer | Integer |
| double | Double |
| float | Float |
| boolean | Boolean |
| date | Date |
| decimal | BigDecimal |
| bigdecimal | BigDecimal |
| object | Object |
| map | Map |
| hashmap | HashMap |
| list | List |
| arraylist | ArrayList |
| collection | Collection |
| iterator | Iterator |
总结:Mybatis给Java类型中的基本类型、包装类型和集合类型起了内置的别名,基本都是名称的小写。
tips:建立JavaBean的时候,JavaBean的成员变量的属性应该尽量使用包装类型。
4) typeHandlers
这个是类型处理器,主要是用来帮助我们把数据库中的数据类型转化为Java中的数据类型。
Mybatis有很多默认的类型处理器,可以帮助我们做类型的转化。
5) Environment
这个是关于Mybatis的环境配置,其实也就是数据库的环境的配置。
Mybatis的环境配置主要是帮助我们去连接多个数据库。
<!-- 采用的环境的名字-->
<environments default="test">

    <!-- test环境-->
    <environment id="test">
        <!-- 事务管理器 ,表示JDBC来管理事务
            JDBC:这个是采用JDBC来管理事务,和之前事务的使用方式一样
            MANAGED:表示交给容器来管理事务,例如 Spring -->
        <transactionManager type="JDBC"/>

        <!-- 数据源
                POOLED:表示采用连接池来管理连接
                UNPOOLED:表示不采用连接池来管理连接
                JNDI:其实就是表示Mybatis使用第三方的数据源 -->
        <dataSource type="POOLED">
            <!-- 驱动,用户名,账号,密码的配置-->
            <property name="driver" value="${driverClassName}"/>
            <property name="url" value="${url}"/>
            <property name="username" value="${username}"/>
            <property name="password" value="${password}"/>
        </dataSource>
    </environment>

    <!-- dev环境-->
    <environment id="dev">
        <transactionManager type="JDBC"/>
        <dataSource type="POOLED">
            <property name="driver" value="${driverClassName}"/>
            <property name="url" value="${url}"/>
            <property name="username" value="${username}"/>
            <property name="password" value="${password}"/>
        </dataSource>
    </environment>

</environments>
6) Mapper
这个是映射器的配置
<mappers>
    <!-- 指定到具体的配置文件-->
    <!--<mapper resource="it/drizzle/mapper/UserMapper.xml"/>-->
    <!--<mapper resource="it/drizzle/mapper/UserMapper2.xml"/>-->


    <!-- 配置到包下的所有的配置文件 -->
    <package name="it.drizzle.mapper"/>

</mappers>
以上的两种配置选择其中的一种即可
4. ${}和#{}的区别
在Mybatis的mapper文件里面,有两种方式可以获取java传入的值 :
- #{} 底层是调用的prepareStatement,采用的是预编译占位的方式,效率更高,更加安全

- ${} 底层是采用的statement,底层还是字符串拼接,有sql注入的风险,但有特定的使用场景

    #{}会把传入的数据都当成一个字符串来处理,会在传入的数据上面加引号

	${}则是把传入的数据直接显示在sql语句中,不会添加双引号(这意味着如果非要传入非表名或列名的参数,需要自己加引号)

    statement有数据库注入的风险,工作中我们应该尽量使用PrepareStatement,也就是使用#{} 这种方式
- ${} 的使用场景:

  当我们对SQL语句传入表名或者是列名的时候,我们需要使用${} 来取值。
  (因为如果使用 #{} 来取值,SQL语句会先预编译(缺少表名 或者是列名),预编译会通不过)

   - 当数据库分表后,需要传入表名
     分表:同一种数据,分开在不同的表(这些不同的表,只有名字不同,结构是一样的)中存储的情况

   - 当需要排序、分组的时候,也要传入列名

 这些场景中虽然需要传值,但都不会是用户输入的值,即便是列名、我们也会进行各种限制,避免用户输入这些内容,造成安全隐患
使用示例:
Order[] selectOrderArray(String tableName);<sql id="all_column">
id, order_name as orderName, price, user_id as userId
</sql>
<select id="selectOrderArray" resultType="cn.itdrizzle.bean.Order">
select <include refid="all_column" />
from ${tableName}
</select>@Test
public void testSelectOrderArray(){
String tableName = "`order`";
Order[] orders = orderMapper.selectOrderArray(tableName);
for (int i = 0; i < orders.length; i++) {
System.out.println(orders[i]);
}
}5. mybatis缓存
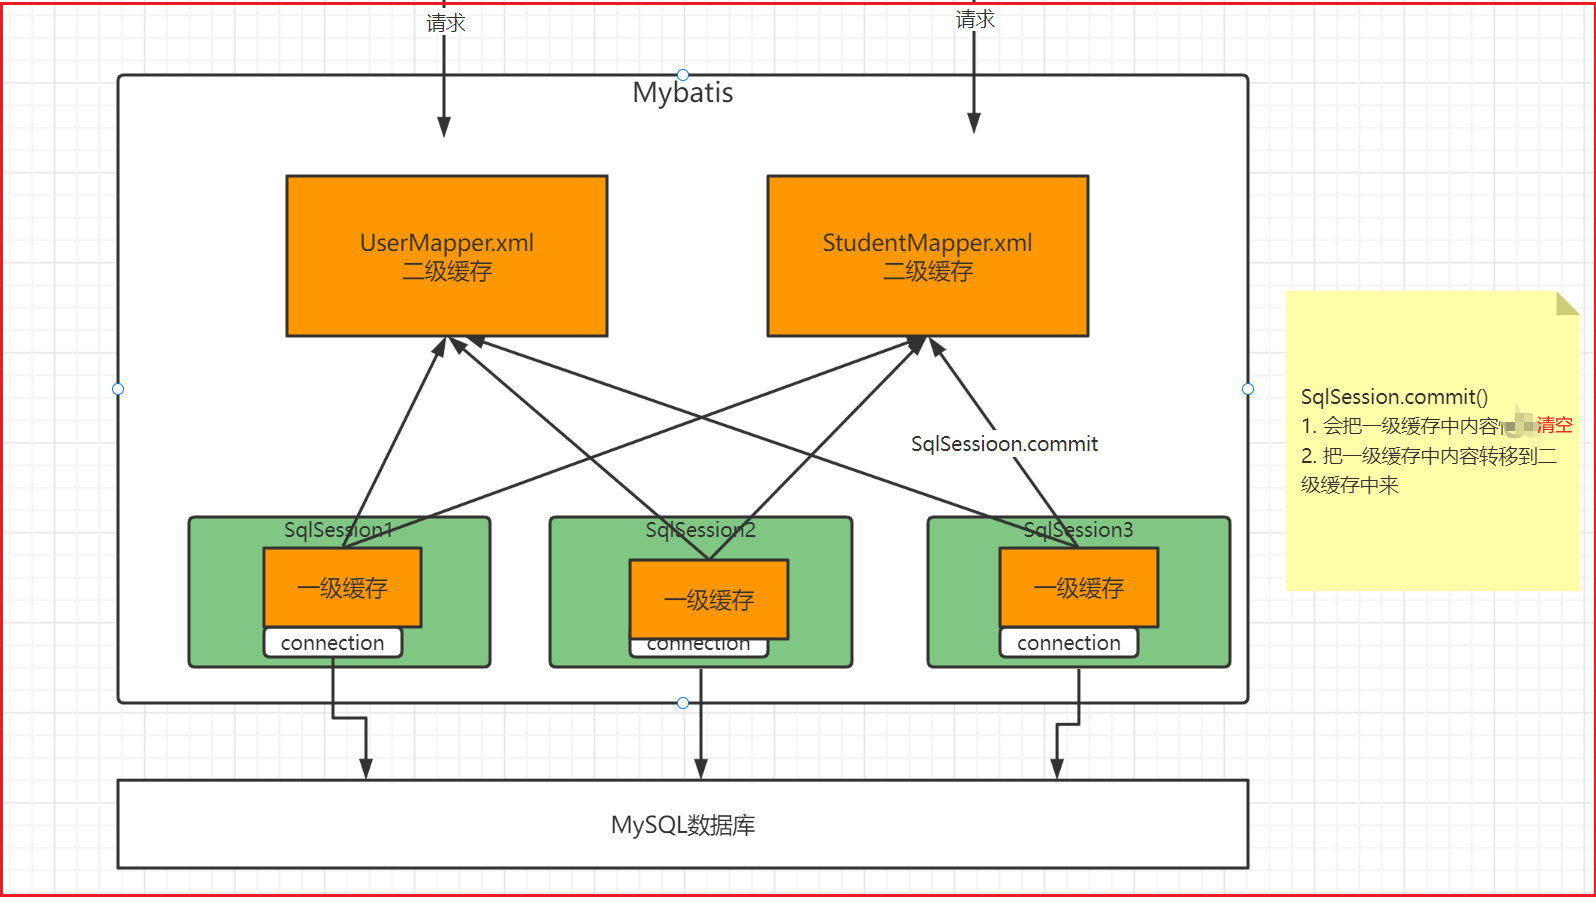
Mybatis可以给我们缓存查询的结果。
Mybatis的缓存有两种,分别叫做一级缓存和二级缓存。
一级缓存:
Mybatis的一级缓存是一个SqlSession级别的缓存。
意思就是使用同一个SqlSession,去使用同样的条件查询同样的数据,那么在第一次查询完之后,会把查询的结果放到这个SqlSession的内部(内存空间),等到后面查询的时候,假如使用的是同一个SqlSession,传入的是同样的参数,那么这个时候,就会直接从SqlSesssion内部取出结果,并返回,不会查询数据库了。
Mybatis的一级缓存默认是开启的,也没有提供开关给用户关闭。
二级缓存是一个namespace级别的缓存。意思就是每一个Mapper.xml配置文件,都可以开启自己的缓存。
如何开启Mybatis的二级缓存呢?
-
缓存总开关
xml<!-- 二级缓存总开关 默认是开启的--> <setting name="cacheEnabled" value="true"/> -
需要打开具体的Mapper.xml 配置文件的缓存开关
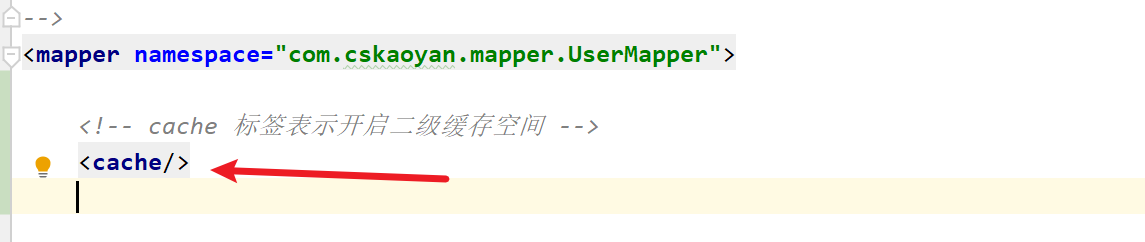
-
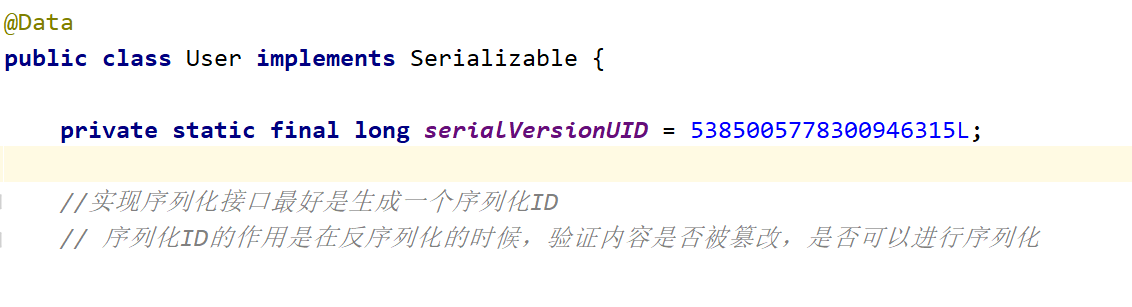
查询涉及到的实例对象,需要实现序列化接口
如何开启呢?
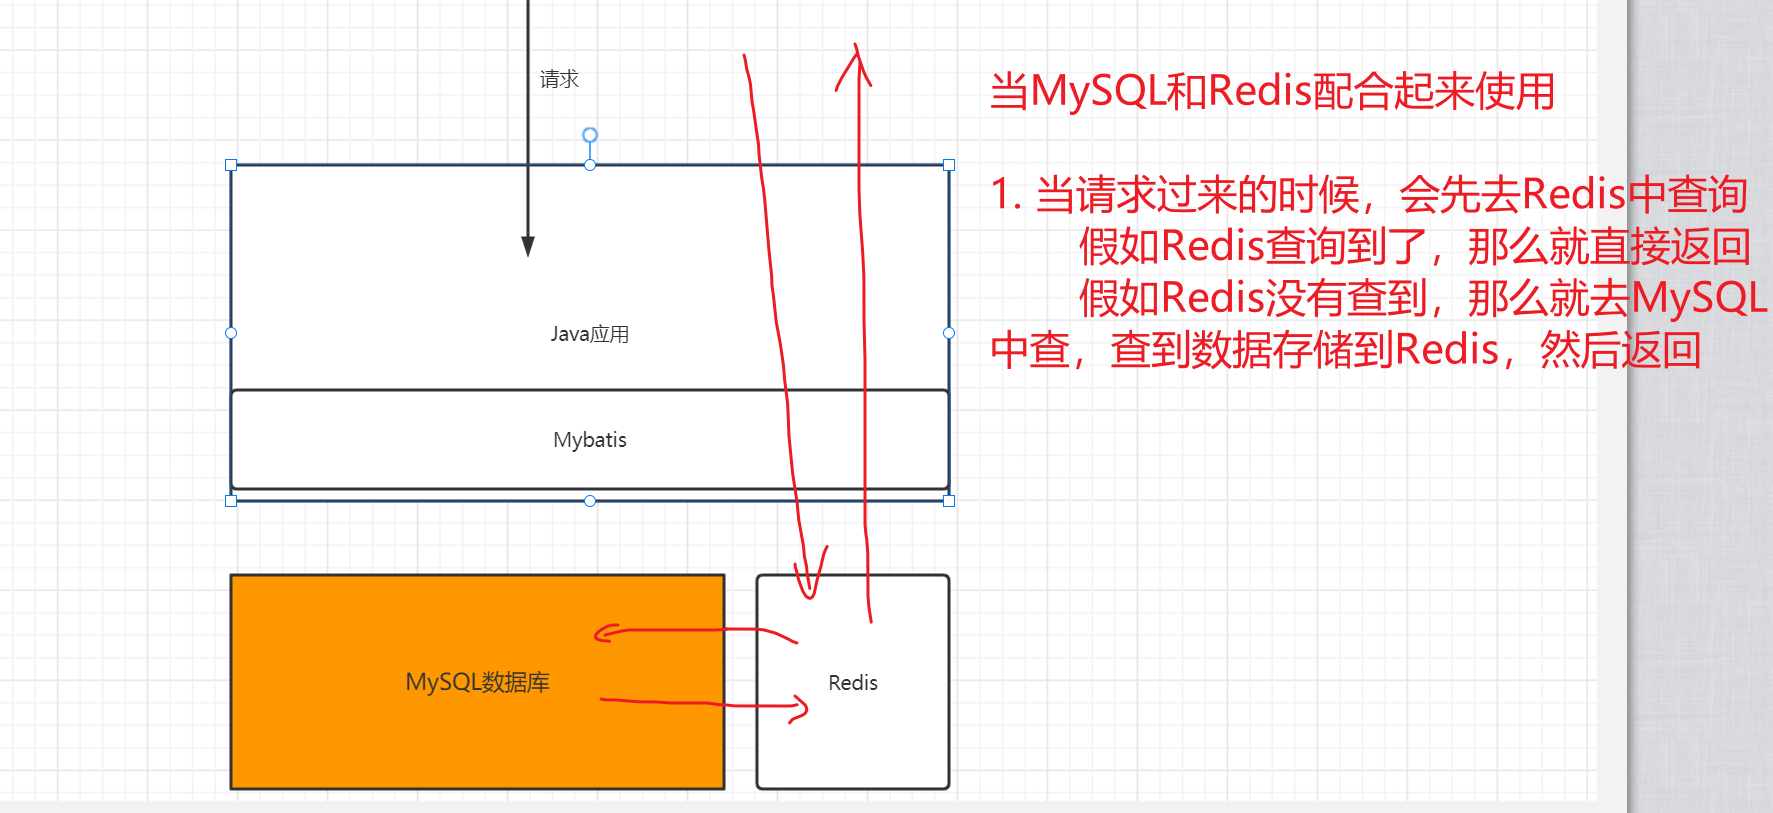
Mybatis的一级缓存和二级缓存在工作中用不用呢? 现在的情况是企业一般不使用Mybatis的一级缓存和二级缓存。
一级缓存不够强大,因为一级缓存的使用有局限性,要基于同一个SQLSession。
二级缓存一般也不用,因为二级缓存作为缓存来说,功能是不够的。
对于缓存的 功能性的支持是比较少 的,而且使用起来,还有安全性的问题。
那么使用什么来当缓存呢?
- Redis
二 输入输出映射
1. 输入映射
输入映射其实就是说Mybatis是如何传值的
1) 一个参数
mapper
// 什么是简单参数呢?
// 在Mybatis中,基本类型+String + 包装类型 = 简单参数
User selectUserById(Integer id);
mapper.xml
<select id="selectUserById" resultType="com.cskaoyan.bean.User">
    select * from user where id = #{id}
</select>
#{任意值} 这种方式来取值。
tip:当只传一个参数的时候,假如这个参数配置了@Param注解,那么后续就不能通过 #{任意值} 来取值了
2) 多个参数
1. 按照参数出现的顺序 (几乎不用)

2. 使用java对象传参 (常用)

3. 使用@Param注解传参 (常用)

4. 使用 map 传参(几乎不用)
1. 按照参数顺序:
// Mapper接口
Integer insertUser3(String username, String password, int age, String gender);
mapper.xml:
<insert id="insertUser3">
    insert into user values (null, #{arg0}, #{arg1}, #{arg2}, #{arg3})
</insert>
arg0, arg1… 还可以替换为 param1, param2 …
但这种方式可读性较差,当参数个数增加时,很容易出错
**2. 使用java对象传参 **:
// Mapper接口
Integer insertUser1(User user);
mapper.xml:
<insert id="insertUser1" parameterType="cn.itdrizzle.bean.User">
    insert into user values (#{id}, #{username}, #{password}, #{age}, #{gender})
</insert>
#{成员变量名} 来取值。本质上是通过JavaBean中的getter的名字来取值。一般成员变量名和getter方法是同名的。
**3. 使用@Param注解传参 **:
// Mapper接口
Integer insertUser2(@Param("user") User user);

Integer insertUser4(@Param("name") String username,
                    @Param("pw") String password,
                    @Param("age") int age,
                    @Param("gender") String gender);
mapper.xml:
<insert id="insertUser2">
    insert into user values (#{user.id}, #{user.username}, #{user.password}, #{user.age}, #{user.gender})
</insert>

<insert id="insertUser4">
    insert into user values (null, #{name}, #{pw}, #{age}, #{gender})
</insert>
注意:当参数中的对象有@Param注解的时候,我们需要通过 #{注解的值 . 成员变量名} 来取值。
**4. 使用 map 传参 **:
// Mapper接口
User selectUserByMap(Map map);
注意:当接口中使用了 @Param 注解时,在xml配置文件中的使用方式和对象+注解的方式类似
mapper.xml:
<select id="selectUserByMap" resultType="cn.itdrizzle.bean.User" parameterType="java.util.Map">
    select * from user where username = #{name} and age = #{age}
</select>@Test
public void testSelectByMap() {
HashMap<String, Object> map = new HashMap<String, Object>();
map.put("name", "zhangsan");
map.put("age", 88);
User user = userMapper.selectUserByMap(map);
System.out.println(user);
}由上可见,map中的key值是不可控的,可由调用者随意命名,故该方式不推荐使用
2. 输出映射
输出映射即Mybatis 可以通过哪些方式给我们封装从数据库返回的数据。
1) 简单类型
返回简单类型:(包括:Java语法中的基本类型、包装类以及字符串 Java.lang.String)
不论你需要返回单个值、还是返回一个List,都只需要在接口中指定类型即可,xml文件中的 resultType 属性可设置也可以不设置
2) Java对象
返回一个Java对象(或者说java bean 、实体类等):
接口中返回值为类名,xml中 resultType 需要设置 全限定类名
// JavaBean
User selectById(Integer id);

// 列名和表字段名不一致的情况
UserVO selectById2(Integer id);<select id="selectById" resultType="com.xxx.vo.User">
select * from user where id = #{id}
</select>
<!-- 如果出现数据库中列的值和对象中成员变量的值对应不上的时候,可以采用别名的方式来解决 (或者参照后面的ResultMap)-->
<select id="selectById2" resultType="com.xxx.vo.UserVO">
select id,name as username,email,age from user where id = #{id}
</select>3) ResultMap
Mybatis给开发者提供的高级映射功能,目前可以先使用一个简单版本,连接查询的时候 ResultMap还大有用武之地
// resultMap
User selectUserById(@Param("id") Integer id);

List<User> selectAllUser();
<resultMap id="user2Map" type="com.xxx.bean.User">
    <!-- 主键通过id标签来映射,可以帮助我们在多表查询的时候提高效率
		column: 列名
		property:成员变量名     -->
    <id column="id" property="id"/>
    <result column="name" property="username"/>
    <result column="age" property="age"/>
    <result column="nickname" property="nickname"/>

</resultMap>

<select id="selectUserById" resultMap="user2Map">
    select * from user where id = #{id}
</select>

<select id="selectAllUser" resultMap="user2Map">
    select * from user
</select>
三 mybatis动态SQL
1. if和where
Mapper接口:
void updateUsernameOrAgeById(User user);mapper.xml:
<update id="updateUsernameOrAgeById" parameterType="cn.itdrizzle.bean.User">
    update user
    <set>
        <if test="username != null">username = #{username},</if>
        <if test="age != null">age = #{age},</if>
    </set>
    <where>
        id = #{id}
    </where>
</update>/*
where标签三个作用:
1. sql语句中拼接where字符
2. sql语句中去除跟着的and或者or
3. where 标签里面没有内容,不会拼接where
xml文件中如果需要用到小于,需要使用转义字符(正常大于没有问题,但是也推荐使用转义字符)
特殊字符 转义字符 OGNL
> > gt
< < lt
>= >= gte
<= <= lte2. choose when otherwise
if并没有else标签,在Mybatis中使用 choose-when-otherwise 来替代 if-else 的作用
这个标签就相当于java中的 `if else`:

<when>       相当于  if

<otherwise>  相当于  else
<select id="selectUserListById" resultType="com.xxx.bean.User">
    select * from user where
        <choose>
            <when test="id gt 3">
                id = (select max(id) from user)
            </when>
            <otherwise>
                id = (select min(id) from user)
            </otherwise>
        </choose>
</select>
3. trim和set
trim示例:
    <!--
        prefix: 增加指定的前缀
        suffix: 增加指定的后缀
        prefixoverrdes:  删除指定的前缀
        suffixOverrides: 删除指定的后缀
    -->
mapper
// 根据id修改user的值,假如成员变量没有值,那么不修改
int updateUserByIdSelective(@Param("user") User user);
mapper.xml
<update id="updateUserByIdSelective">

    update user
    <trim prefix="set" suffix="" prefixOverrides="" suffixOverrides=",">
          <if test="user.name != null"> name = #{user.name},</if>
          <if test="user.age != null"> age = #{user.age},</if>
          <if test="user.nickname != null"> nickname = #{user.nickname},</if>
    </trim>
    <where>
        id = #{user.id}
    </where>
</update>set示例:
mapper
// 根据id修改user的值,假如成员变量没有值,那么不修改
int updateUserByIdSelectiveUseSet(@Param("user") User user);
mapper.xml
<update id="updateUserByIdSelectiveUseSet">
    update user
    <set>
        <if test="user.name != null"> name = #{user.name},</if>
        <if test="user.age != null"> age = #{user.age},</if>
        <if test="user.nickname != null"> nickname = #{user.nickname},</if>
    </set>
    <where>
        id = #{user.id}
    </where>
</update>
<set> 标签就相当于 <trim prefix="set" suffixOverrides=","> 这个配置。
4. sql和include
在Mybatis中,对重复使用的代码片段可以使用sql标签单独列出来,然后在各个sql语句中使 用标签引入代码片段
一般使用 sql-include 标签来帮助我们提取列名
Mapper接口:
List<User> selectUserDynamic(User user);mapper.xml:
<sql id="all_column">
    id, username, password, age, gender
</sql>

<select id="selectUserDynamic" resultType="cn.itdrizzle.bean.User">
    select <include refid="all_column"/>
    from user
    <where>
        <if test="username != null"> and username = #{username} </if>
        <if test="age != null"> and age = #{age} </if>
        <if test="gender != null"> and gender = #{gender} </if>
    </where>
</select>
5. selectKey获取自增ID
selectKey标签:这个标签可以帮助我们在执行目标SQL语句之前或者之后执行额外的一条SQL语句
Mapper接口:
Integer insertUserAndGetId(@Param("user") User user);mapper.xml:
<insert id="insertUserAndGetId" parameterType="cn.itdrizzle.bean.User">
    insert into user values (null, #{user.username}, #{user.password}, #{user.age}, #{user.gender})
    <selectKey resultType="integer" order="AFTER" keyProperty="user.id">
        select last_insert_id()
    </selectKey>
</insert>
测试类:
@Test
public void testInsertUserAndGetId(){
    User user = new User();
    user.setUsername("user2205");
    user.setPassword("123456");
    user.setAge(19);
    user.setGender("female");

    Integer affectedRows = userMapper.insertUserAndGetId(user);
    System.out.println("affectedRows = " + affectedRows);
    System.out.println("插入成功, ID = " + user.getId());
}useGeneratedKeys属性:
<!--
除了上述方式外,获取自增ID还可以直接使用 insert标签的 useGeneratedKeys 属性:
    useGeneratedKeys: 表示开启自增主键的功能
    keyProperty: 表示把值映射到哪里去
-->
<insert id="insertUserAndGetId" useGeneratedKeys="true" keyProperty="user.id">>
    insert into user values (null, #{user.username}, #{user.password}, #{user.age}, #{user.gender})
    <selectKey resultType="integer" order="AFTER" keyProperty="user.id">
        select last_insert_id()
    </selectKey>
</insert>

<!-- useGeneratedKeys (insert and update only)
This tells MyBatis to use the JDBC getGeneratedKeys method to retrieve keys generated internally
by the database (e.g. auto increment fields in RDBMS like MySQL or SQL Server). Default: false.
6. foreach标签
The foreach element is very powerful, and allows you to specify a collection, declare item and index variables that can be used inside the body of the element.
It also allows you to specify opening and closing strings, and add a separator to place in between iterations.
The element is smart in that it won’t accidentally append extra separators.
foreach标签 使用场景 :1 - in 查询、 2 - 批量插入
Mapper接口:
int insertOrderBatch(@Param("orderList") List<Order> orderList);

List<Order> selectOrderByIds(@Param("ids") Integer[] ids);
mapper.xml:
<insert id="insertOrderBatch">
    insert into `order` values
    <foreach collection="orderList" item="o" separator=",">
        (null, #{o.orderName}, #{o.price}, #{o.userId})
    </foreach>
</insert>

<select id="selectOrderByIds" resultType="cn.itdrizzle.bean.Order">
    select id, order_name as orderName, price
    from `order` where
    <foreach collection="ids" item="id" open="id in (" close=")" separator=",">
        #{id}
    </foreach>
</select>【注意】:<foreach collection=""> 标签的collection属性
当接口中使用了 @Param 注解时,直接使用 注解中的名字即可,入上例中情形
但如果接口中没有使用注解,
那么如果是 List 类型,则可以使用 agr0 | collection | list 三种方式均可
如果是数组类型,则可以使用 arg0 | array
测试类:
// in 查询测试
@Test
public void testSelectOrderByIds(){
    Integer[] ids = {3, 4, 5};

    List<Order> orderList = orderMapper.selectOrderByIds(ids);

    for (Order order : orderList) {
        System.err.println(order);
    }
}

// 批量插入
@Test
public void testInsertOrderBatch(){
    List<Order> orderList = new ArrayList<>();

    int num = 5;
    int start = 11;
    while (num > 0) {
        String orderName = "mystery" + start;
        Long price = (long) (Math.random() * 999999 + 1000);
        Integer userId = (int) (Math.random() * 100);
        Order order = new Order(null, orderName, price, userId);
        orderList.add(order);
        start++;
        num--;
    }
    System.out.println(orderList);

    int affectedRows = orderMapper.insertOrderBatch(orderList);
    System.out.println("batch insert affectedRows = " + affectedRows);
}
四 mybatis多表查询
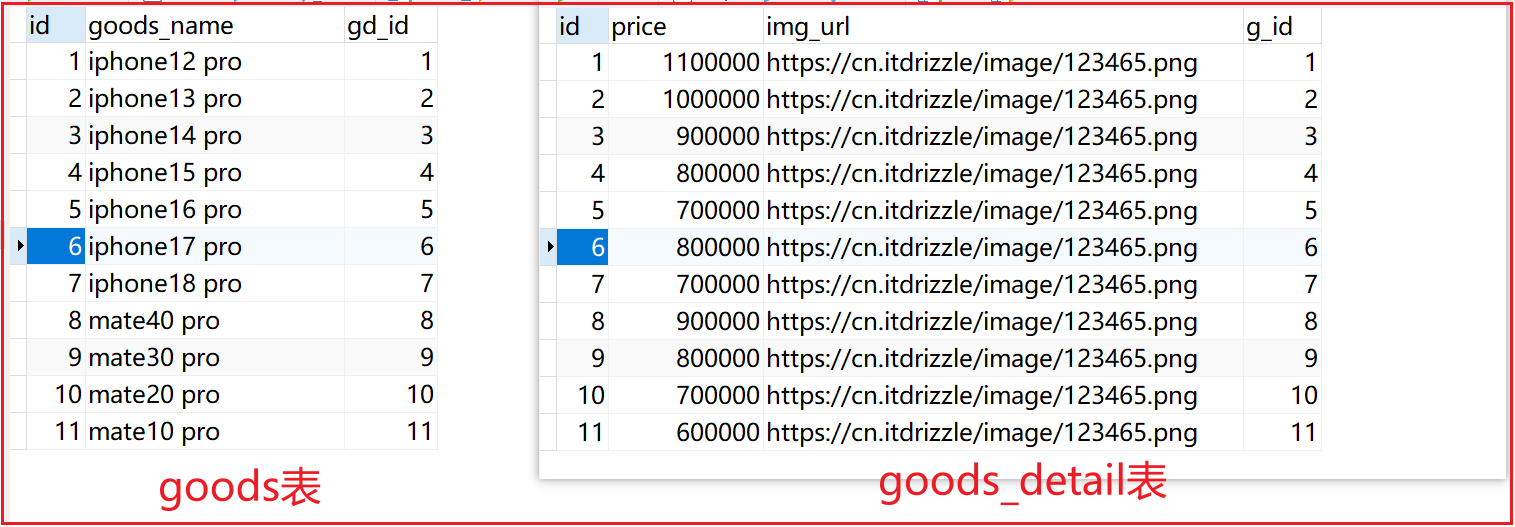
1. 一对一查询
Mapper接口:
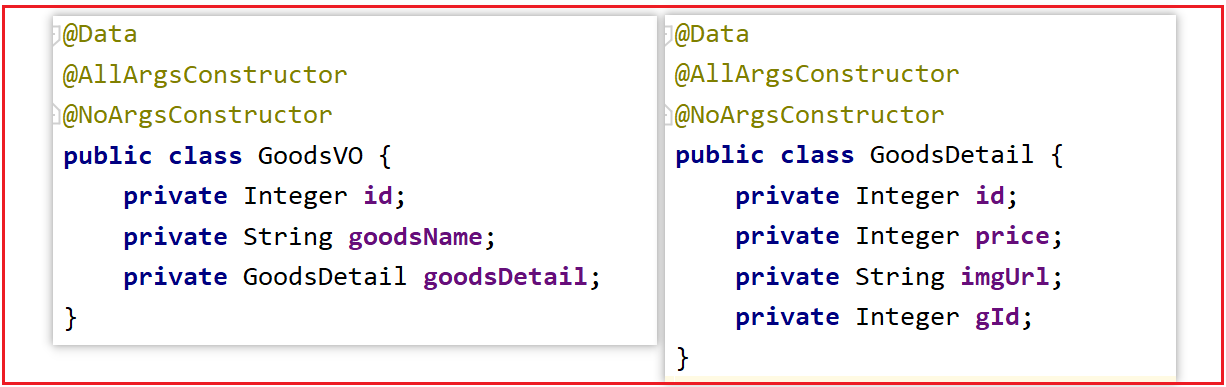
public interface GoodsMapper {

    GoodsVO selectGoodsById(Integer id);

    List<GoodsVO> selectGoodsByIds(@Param("idList") List<Integer> idList);

    GoodsDetail selectGoodsDetailById(Integer id);
}<!DOCTYPE mapper PUBLIC "-//mybatis.org//DTD Mapper 3.0//EN" "http://mybatis.org/dtd/mybatis-3-mapper.dtd" >
<mapper namespace="cn.itdrizzle.mapper.GoodsMapper">
<!--连接查询-->
<resultMap id="goodsMap" type="cn.itdrizzle.bean.vo.GoodsVO">
<id column="id" property="id"/>
<result column="goods_name" property="goodsName"/>
<association property="goodsDetail" javaType="cn.itdrizzle.bean.GoodsDetail">
<id column="gd_id" property="id"/>
<result column="price" property="price"/>
<result column="img_url" property="imgUrl"/>
</association>
</resultMap>
<select id="selectGoodsById" resultMap="goodsMap">
select *
from goods as g
left join goods_detail as gd
on g.gd_id = gd.id
where g.id = #{id}
</select>
<!--分次查询-->
<select id="selectGoodsByIds" resultMap="goodsMap2">
select * from goods
where id in
<foreach collection="idList" item="id" open="(" close=")" separator=",">
#{id}
</foreach>
</select>
<resultMap id="goodsMap2" type="cn.itdrizzle.bean.vo.GoodsVO">
<id column="id" property="id"/>
<result column="goods_name" property="goodsName"/>
<association property="goodsDetail" javaType="cn.itdrizzle.bean.GoodsDetail"
select="selectGoodsDetailById"
column="gd_id"
/>
</resultMap>
<select id="selectGoodsDetailById" resultType="cn.itdrizzle.bean.GoodsDetail">
select id, price, img_url as imgUrl, g_id as gId
from goods_detail where id = #{id}
</select>
</mapper>测试类:
public class GoodsMapperTest {
    static GoodsMapper goodsMapper;

    static {
        try {
            InputStream inputStream = Resources.getResourceAsStream("mybatis-config.xml");
            SqlSessionFactory sqlSessionFactory = new SqlSessionFactoryBuilder().build(inputStream);
            SqlSession sqlSession = sqlSessionFactory.openSession(true);
            goodsMapper = sqlSession.getMapper(GoodsMapper.class);
        } catch (IOException e) {
            e.printStackTrace();
        }
    }

    @Test
    public void testSelectGoodsById(){
        GoodsVO goodsVO = goodsMapper.selectGoodsById(3);
        System.out.println(goodsVO);
    }

    @Test
    public void testSelectGoodsDetailByIds(){
        ArrayList<Integer> idList = new ArrayList<>();
        idList.add(3);
        idList.add(9);
        List<GoodsVO> goodsVOList = goodsMapper.selectGoodsByIds(idList);

        for (GoodsVO goodsVO : goodsVOList) {
            System.out.println(goodsVO);
        }
    }
}
2. 一对多查询
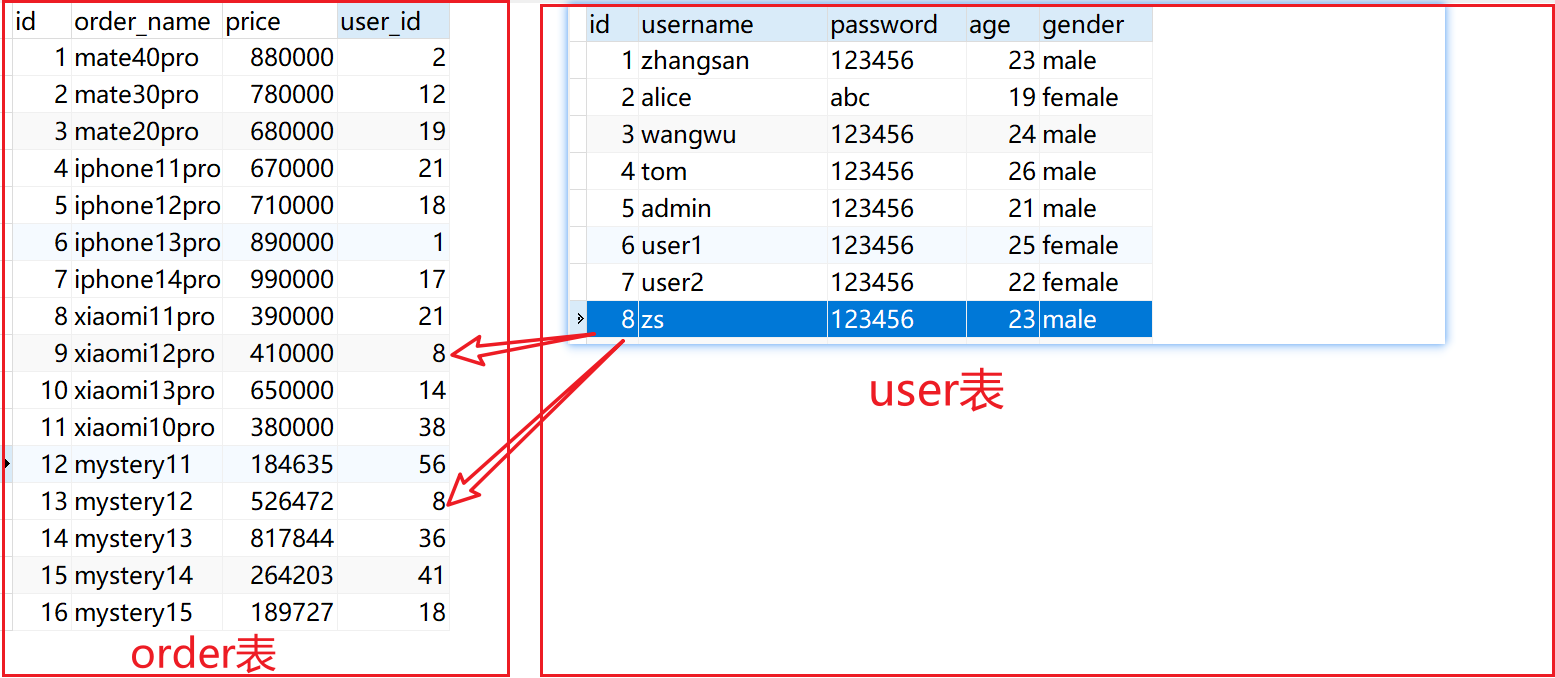
Mapper接口:
// 查询指定id的用户及其对应的订单列表
UserVO selectUserVOById(@Param("id") Integer id);
mapper.xml:
<!-- UserMapper.xml -->
	<!-- 连接查询 -->
    <select id="selectUserVOByIds" resultMap="userVOMap">
        select * from user as u
        left join `order` as o on u.id = o.user_id
        where u.id in
            <foreach collection="idList" item="id" open="(" close=")" separator=",">
                #{id}
            </foreach>
    </select>
    <resultMap id="userVOMap" type="cn.itdrizzle.bean.vo.UserVO">
        <id column="id" property="id"/>
        <result column="username" property="username"/>
        <result column="password" property="password"/>
        <result column="age" property="age" />
        <result column="gender" property="gender"/>
        <collection property="orderList" ofType="cn.itdrizzle.bean.Order">
            <id column="oid" property="id"/>
            <result column="order_name" property="orderName"/>
            <result column="price" property="price"/>
        </collection>
    </resultMap>


    <!-- 分次查询 -->
    <select id="selectUserVOById" resultMap="userVOMap2">
        select  id as uid, username, password, age, gender
        from user where id = #{id}
    </select>
    <resultMap id="userVOMap2" type="cn.itdrizzle.bean.vo.UserVO">
        <id column="uid" property="id"/>
        <result column="username" property="username"/>
        <result column="password" property="password"/>
        <result column="age" property="age" />
        <result column="gender" property="gender"/>
        <association property="orderList" javaType="java.util.List"
                     select="cn.itdrizzle.mapper.OrderMapper.selectOrderByUserId"
                     column="uid"
        />
</resultMap><!-- OrderMapper.xml -->
<select id="selectOrderByUserId" resultType="cn.itdrizzle.bean.Order">
select id, order_name as orderName, price, user_id as userId
from `order`
where user_id = #{userId}
</select>测试类:
@Test
public void testSelectUserVOById(){
    UserVO userVO = userMapper.selectUserVOById(8);
    System.out.println(userVO);
}
3. 多对多查询
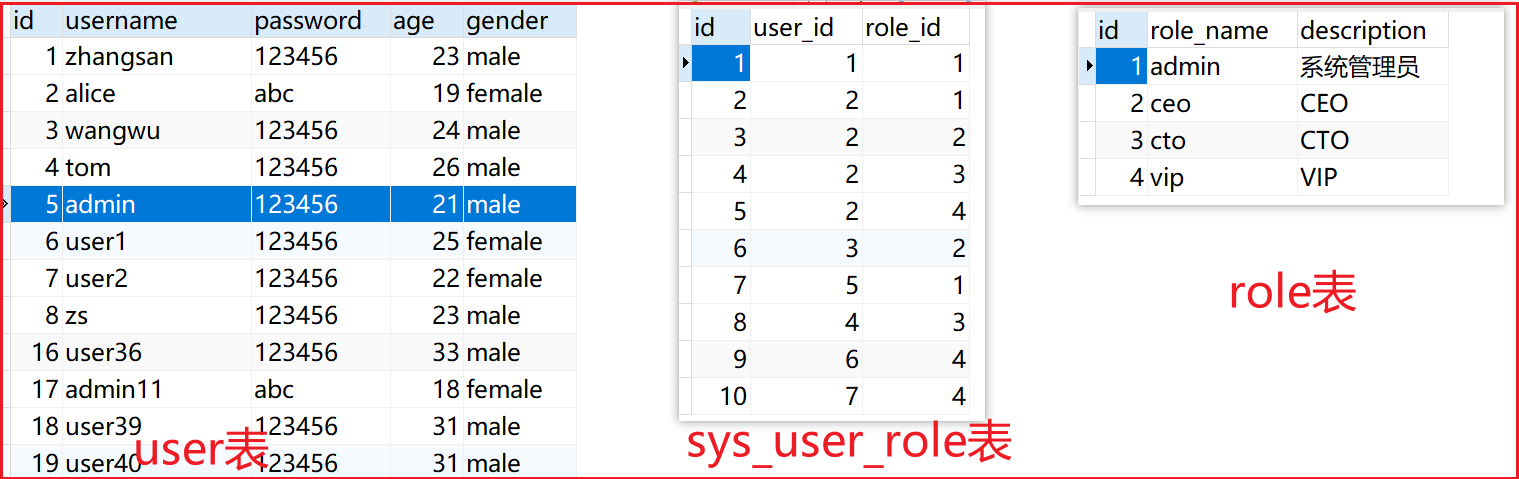
// UserRoleVO.java
@Data
@AllArgsConstructor
@NoArgsConstructor
public class UserRoleVO {
    private Integer id;
    private String username;
    private String password;
    private Integer age;
    private String gender;
    private List<Role> roleList;
}
Mapper接口:
// 查询用户信息(包括有哪些 role )
UserRoleVO selectUserRoleVOById(Integer id);

List<UserRoleVO> selectUserRoleVOByIds(List<Integer> idList);
mapper.xml:
<!--多表查询 —— 多对多 (连接查询:与一对多的方式基本一致) -->
    <select id="selectUserRoleVOById" resultMap="userRoleVOMap">
        select u.id as uid, username, `password`, age, gender,role_id, role_name, description
        from user as u
        left join sys_user_role as ur on u.id = ur.user_id
        left join role as r on ur.role_id = r.id
        where u.id = #{id}
    </select>
    <resultMap id="userRoleVOMap" type="cn.itdrizzle.bean.vo.UserRoleVO">
        <id column="uid" property="id"/>
        <result column="username" property="username"/>
        <result column="password" property="password"/>
        <result column="age" property="age" />
        <result column="gender" property="gender"/>
        <collection property="roleList" ofType="cn.itdrizzle.bean.Role">
            <id column="role_id" property="id"/>
            <result column="role_name" property="roleName"/>
            <result column="description" property="description"/>
        </collection>
    </resultMap>


    <!--多表查询 —— 多对多 (分次查询 ) -->
    <select id="selectUserRoleVOByIds" resultMap="userRoleVOMap2">
      select * from user
      where id in
          <foreach collection="list" item="id" open="(" close=")" separator=",">
              #{id}
          </foreach>
    </select>
    <resultMap id="userRoleVOMap2" type="cn.itdrizzle.bean.vo.UserRoleVO">
        <id column="id" property="id"/>
        <result column="username" property="username"/>
        <result column="password" property="password"/>
        <result column="age" property="age" />
        <result column="gender" property="gender"/>
        <collection property="roleList" ofType="cn.itdrizzle.bean.Role"
                    select="selectRoleByUserId"
                    column="id"
        />
    </resultMap>

    <!--根据用户 id查询 角色 -->
    <select id="selectRoleByUserId" resultType="cn.itdrizzle.bean.Role">
        select role_id as id, role_name as roleName, description
        from sys_user_role as ur
        left join role as r on ur.role_id = r.id
        where user_id = #{id}
    </select>
测试类:
// 多对多
@Test
public void testSelectUserRoleVOById(){
    UserRoleVO userRoleVO = userMapper.selectUserRoleVOById(2);
    System.out.println(userRoleVO);
}

@Test
public void testSelectUserRoleVOByIds(){
    ArrayList<Integer> idList = new ArrayList<>();
    idList.add(2);
    idList.add(5);

    List<UserRoleVO> userRoleVOList = userMapper.selectUserRoleVOByIds(idList);
    for (UserRoleVO userRoleVO : userRoleVOList) {
        System.out.println(userRoleVO);
    }
}
五 使用技巧及问题记录
1. IDEA常用插件
Lombok:
先在 IDEA 中 安装 Lombok 插件,然后在项目中导包即可使用
<dependency>
    <groupId>org.projectlombok</groupId>
    <artifactId>lombok</artifactId>
    <version>1.18.22</version>
</dependency>// 使用示例:
@Data // 有无参构造
@AllArgsConstructor // 全参构造(会导致@Data的无参构造失效)
@NoArgsConstructor // 无参构造(可以用来解决@AllArgsConstructor导致的@Data无参构造失效问题)
public class Student {
private Integer id;
private String name;
private String gender;
private Integer age;
}lombok也会带来一些问题:
一个项目组中,只要有一个人使用lombok,那么大家就都得使用lombok,其实不太友好
( 项目组中不要做第一个使用Lombok的人!)
MyBatisCodeHelper-Pro:
Document: https://gejun123456.github.io/MyBatisCodeHelper-Pro
Mybatis有很多类似的插件,这些插件的功能大同小异。

- 可以帮助我们自动生成@Param注解
- 可以帮助我们在 接口文件 和其对应的 Mapper.xml 之间来回跳转
- 可以帮助我们自动生成标签
- 可以帮助我们提示代码,检查错误
   ......
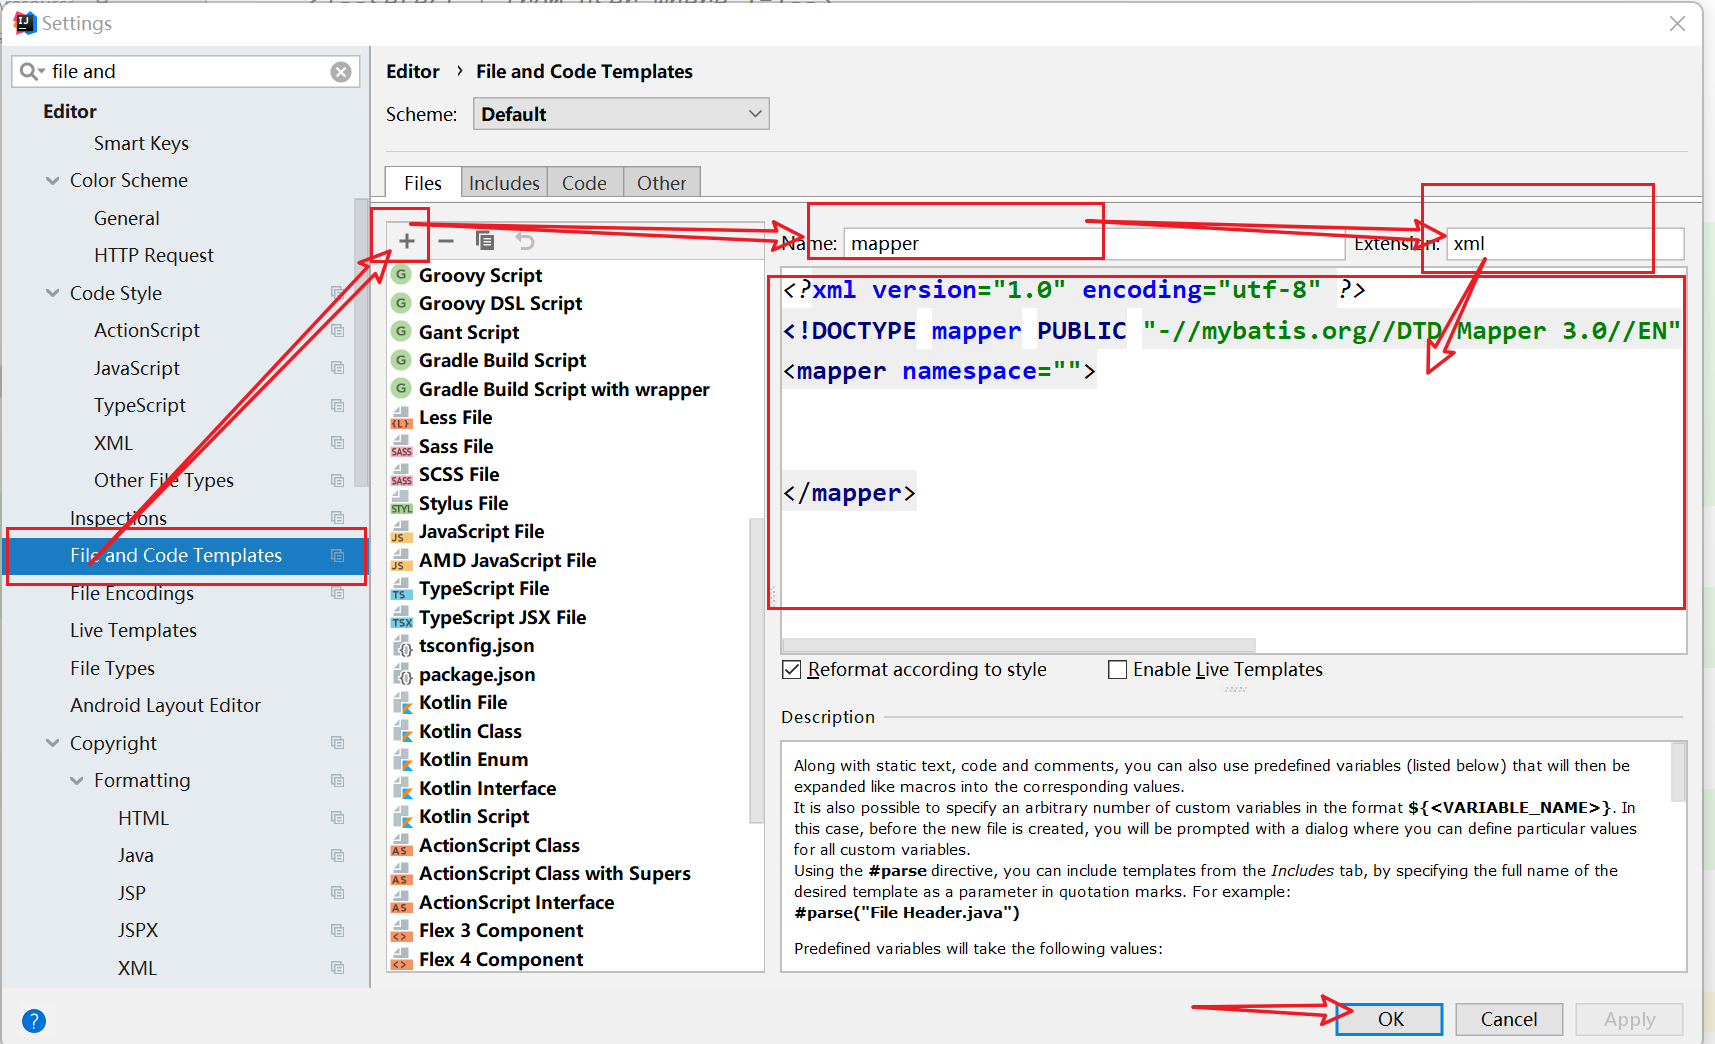
2. mapper文件模板
模板:
<?xml version="1.0" encoding="utf-8" ?>
<!DOCTYPE mapper PUBLIC "-//mybatis.org//DTD Mapper 3.0//EN" "http://mybatis.org/dtd/mybatis-3-mapper.dtd" >
<mapper namespace="">


</mapper>
文件模板设置步骤:
3. 缺失Jboss.VFS
具体问题描述:mybatis开启日志时,IDEA控制台会输出一些多余的干扰信息以及乱码,如下:
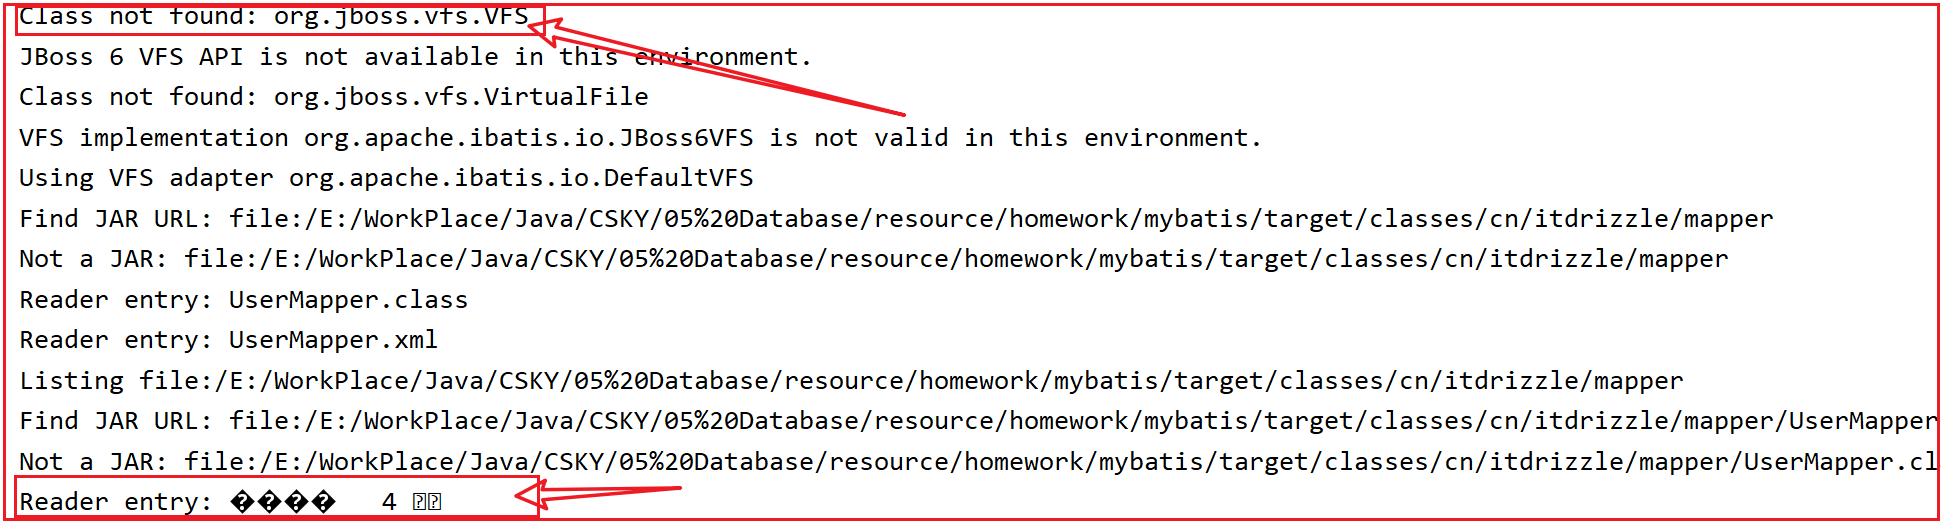
原因( mybatis-config.xml 中使用了 package的方式 ):
<configuration>
    <environments default="development">
        <!--some environments-->
    </environments>

    <typeAliases>
        <typeAlias alias="Tag" type="domain.blog.Tag"/>
        <!-- 此处会调用 VFS -->
        <package name="domain.blog"/>
    </typeAliases>

    <mappers>
        <mapper class="com.demo.mapper.PostMapper"/>

        <!-- 此处会调用 VFS -->
        <package name="com.demo.mapper.builder"/>
    </mappers>
</configuration>
解决方法:引入 Jboss-VFS 即可
<dependency>
    <groupId>org.jboss</groupId>
    <artifactId>jboss-vfs</artifactId>
    <version>3.2.16.Final</version>
</dependency>